Saturday, March 14th, 2010
Stereo Studio is a lightweight stereo pre-visualization tool that provides a high performance shader driven framework for decoding
and encoding stereo content for all display types. In addition to its functionality as a stereo movie player, this tool also provides
support for motion matching, floating window and stereoscopic calibration adjustments, and collaborative workspaces. At a high level,
the top features of this tool include:
Shader driven codec system
Support for all major stereo formats
Expanded media format support
High performance renderer
Custom motion matching (tracking)
Dynamic and adjustable stereo settings
Automatic camera calibrator
Comfort zone hinting
Collaborative annotation system
Scriptable settings system
Multiple monitor support
Hardware accelerated playback
Stereo content re-formatting
Debug menu system
Macro and batch processing
Adjustable playback modes
Render Framework
The essence of the tool is that users provide their own custom decoder and encoder shaders that multiplex between the variety of content encoding formats, and the myriad of output display formats.
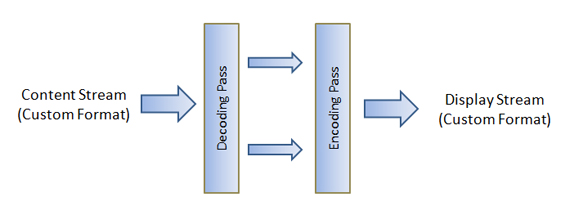
Content is streamed in from a media file and is supplied to a decoding shader pass. This pass is responsible for producing two contiguous images consisting of the left and right views. This data is subsequently processed by the system and then supplied to an encoding shader which formats the data appropriately for display output.
In addition to proper formatting and playback, this tool also supports a number of stereo-guided features such as motion mapping, dynamic floating window adjustments, and parallel separation adjustment (among others). Please note that this document does not provide an exhaustive list of all of the tool's features and users are encouraged to explore the (hopefully) intuitive user interface to learn about advanced features.
Basic Usage
The most common use of this tool is to format and view stereo content. From within the tool, select File > Open > Film, and select the desired content. Alternatively, the playlist editor can be used to load content by selecting Movie > Local Playlist Viewer, and then clicking on the add button. Both methods perform nearly identical operations, except that the former approach will automatically queue up the content and begin playback.
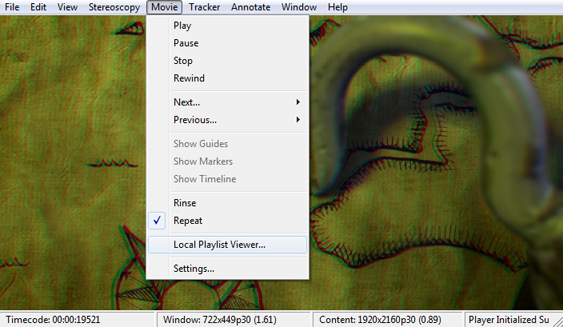
The playlist viewer can be used to load and manage content in the movie player.
Once content is loaded into the system, you must select an appropriate decoder and encoder pair based on the format of the content and the display. For example, if content has been encoded in a left-right fashion, then a left-right decoder must be used. Additionally, if the output display expects a checkerboard formatted image, then a checkerboard encoder must be selected. A set of common encoders and decoders have been provided with the application that cover checkerboard, anaglyph, scanline interleaved, frame interleaved, left-right, and over-under formats. In some cases, trial and error may be used to decipher the proper coding formats. Selection of proper encoders and decoders begins by clicking on the Stereoscopy menu on the top bar and selecting either the encoder viewer or the decoder viewer (as shown below).
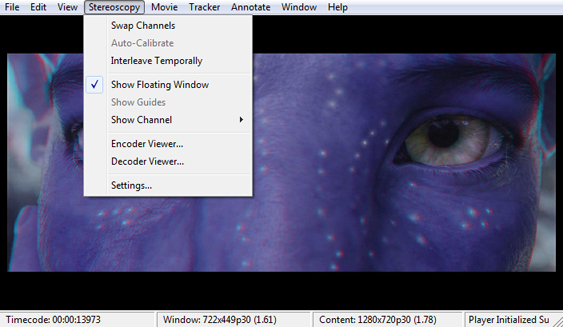
The stereoscopy menu contains an assortment of stereo features and settings, most of which are located within the settings submenu. Changing encoders or decoders is handled by their respective viewers, which are also selected from the stereoscopy menu.
Selection of encoders and decoders occurs in an identical manner. For example, once inside the encoder viewer, you are presented with a list of currently loaded encoders. Encoders and decoders can be added or removed simply by clicking on the appropriate button in the window. The status field (and the green highlight) identify which encoder is currently active. To activate a different encoder, simply double click on the name. Note that all settings in the application take effect immediately (hence the absense of an apply button), so you will receive immediate feedback when activating an encoder as the very next frame rendered will reflect your changes.

The encoder and decoder viewers are virtually identical in form. Activation of a different encoder or decoder will prompt immediate feedback as the very next frame rendered will reflect the change. Users that wish to write custom encoder or decoder shaders should consult those supplied with the application, as they are heavily annotated with descriptive comments that detail the expected inputs and outputs of the application.
Advanced Usage
This tool supports a number of features beyond that of simple stereo playback. Each of the primary components of the application (stereoscopy, movie playback, and tracking) provide a settings menu through which additional variables can be tweaked. Users are also provided an interface for adding custom variables and widgets to the application (which can be piped into the codec shaders). To access additional stereoscopic settings, for example, click on the Stereoscopy menu and select the settings option which will bring up the stereo settings window (as shown below).
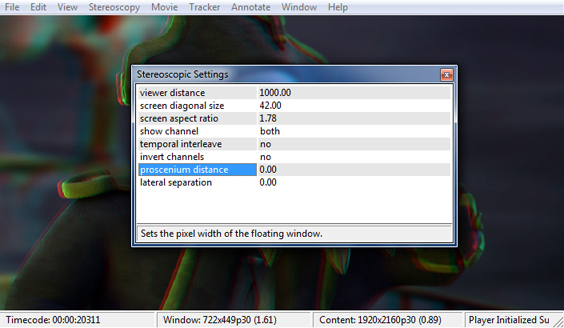
Additional stereo settings can be accessed via the stereoscopic settings window, that is activated by selecting the settings option from the stereoscopy menu.
Channel Selection
Part of the light processing that is performed in between the decoder and encoder passes is the application of a channel mask. This mask allows the user to specify which of the left and right channels should be propagated to the output. The default setting is "both" and can be changed via either the stereoscopy submenus or the stereoscopy settings window. Alternatively, users can press and hold the left and right arrows to momentarily mask the output to either the left or right channel. This function is useful for analyzing the quality of a stereo pair in real time.
Floating Windows
Floating window (or virtual proscenium) adjustments can be made by changing the proscenium variable located on the stereoscopy settings window. Please note that the value supplied is interpreted to indicate the floating window crop amount as a percentage of the total screen size.
Parallel Separation
Interoccular distance can be tweaked by adjusting the lateral separation variable on the stereoscopic settings window. The effect is a horizontal shift that is applied to each channel in order to simulate a change to the interoccular distance.
Temporal Interleaving
Some encoding formats are based on a frame interleave whereby odd frames specify one channel, and even frames specify the other. In order to inform the renderer that the input content should be double buffered to the decoder, users should enable temporal interleaving from the stereoscopic settings window.
Achieving 1:1 Resolution
Care must be taken when rendering stereo content to ensure that pixel data is properly mapped from the input content to the output display. The tool will always perform decoding at the native resolution of the content, but will only encode to the resolution of the display. Thus, users wishing to guarantee a 1:1 mapping of pixels throughout the entire pipeline should ensure that the display resolution matches that of the content, and that the renderer has been informed of the proper operating resolution. Note that the renderer settings must be tweaked in a configuration file (settings.ini) as this setting is not currently exposed through the user interface.
Download the tool
If you're interested in taking the tool for a spin, head over to the stereo studio project page to grab a copy of the beta release. Please report any bugs or issues you encounter!
